3-Sweep User Manual
Last Revised: Jun 13, 2018 by Jiahui Huang
Getting Started
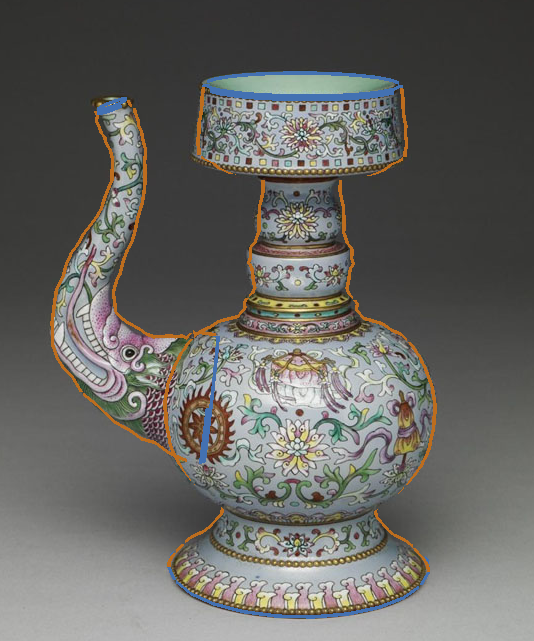
The following steps will guide you through a simple modeling process of a traditional Chinese Vase:
Double click on
3sweep.exeto start the application. The executable is tested on a pure installation of Microsoft Windows 10 with a modern NVIDIA graphics card. The program will automatically choose software OpenGL rendering if hardware acceleration is not possible.Click
 to bring up
 Select an image filewindow, please choosedemo/bendVase.png. The system will prompt whether to use existing border file, please clickYes.By default, we are in
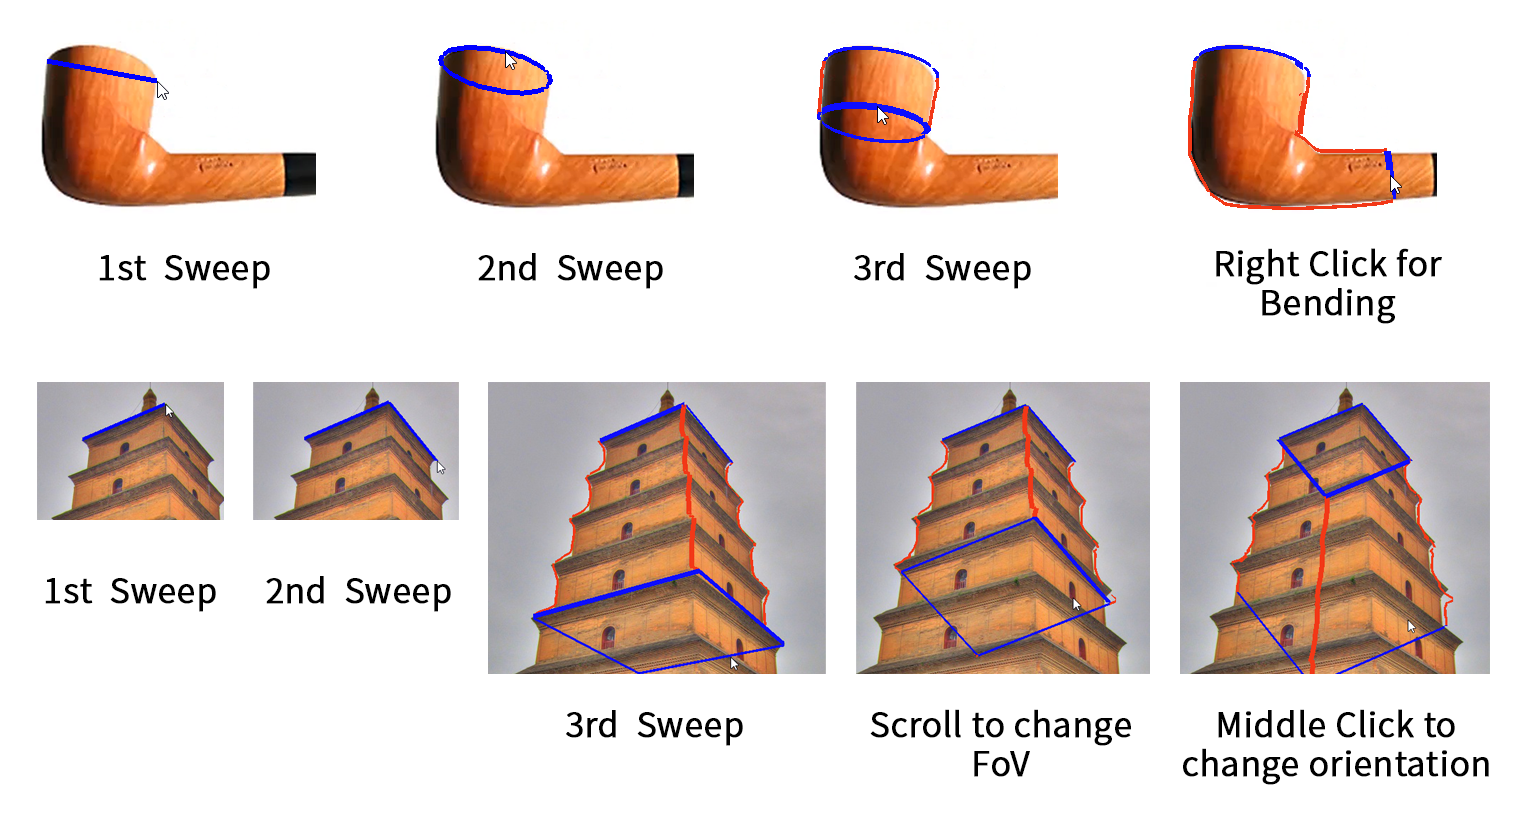
Modeling Modeand you can perform 3-Sweep operations directly on the canvas:- Sweep 1: Press left mouse button and drag.
- Sweep 2: Release mouse button and move the mouse.
- Sweep 3: Click left mouse button and move the mouse. (Scroll middle button to change FoV if you find the perspective is not correct, middle click to change orientation)
- If you want a bend mesh instead of a straight mesh, right click and follow the bending trajectory of the model.
Your canvas now looks like this:
Click
 to bring up constraint window. Now select the two cylinders you have drawn previously by left clicking on them (shift click to add selection), and press
  to add a
 coplanarconstraint.Click
 to start optimization.
Click
 to assign texture to select models. The system will ask you whether to remove foreground (this usually takes 8-10 seconds depending on your image size). Choose
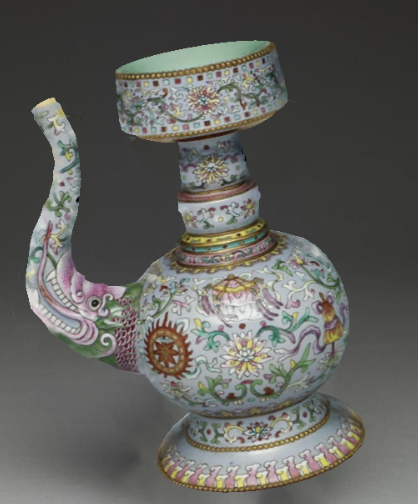
 Yesto continue. Now you have successfully modeled a textured Chinese Vase. Congratulations! Click to switch to
 Viewing Modeand use your right mouse button to rotate the camera around your model:
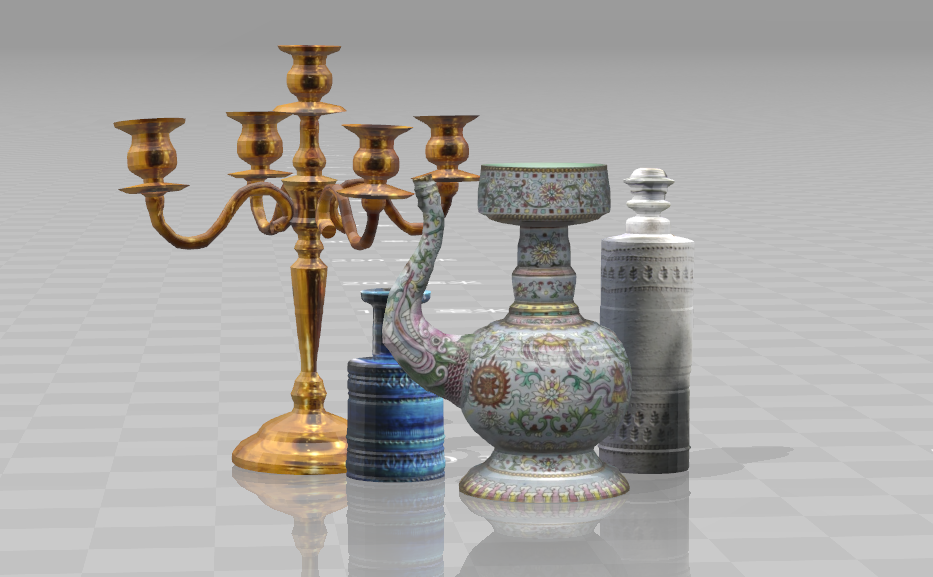
Export
objfile by first selecting two meshes and going tofileExport selected meshes.
Basic Operations
In order to use 3-Sweep like a charm, you should learn and use the 4 modes in this software. They are:
 Modeling Mode : This is where the 3-Sweep magic happens, select a mesh type from toolbar:
  and draw on the canvas.
 Manipulating Mode: You can translate, scale or rotate your model here.
 Viewing Mode: This mode is for moving the camera so that you can view the model in different angles. Click on
  to restore camera to its original location.
 Border Edit Mode: Normally the edge of the image is detected automatically using existing algorithms. You can, however, edit the edge/border of image yourself with the four tools
  provided.
Besides, you can switch between the 4 display modes of your image:
 Normal Picture: In this display mode the input image is displayed on the canvas.
 Background Picture: When you run our texturing algorithm with Patch-Match, automatic foreground removal is performed. This mode shows the image without foreground.
 (-/Labeled) Border Picture: Edge map of input image, used for boundary snapping during modeling. The latter one (Labeled) assembles similar edges into groups (visualized by different colors) for better modeling performance.
You may want to switch between the appearance of your model (Shaded-Mode / Edge-Only Mode, Smooth / Flat Shading) by clicking on  .
.
Grid  switch will display a grid in the origin of the world for visual assistance.
Importing an Image
All of our demonstrations are stored in demo/ folder. We pre-extracted some of the edges for you and the extracted edges are stored in .tsborder file within the same folder.
When you want to import an image, simply go to File Open Image (or click ) and select your target image file. For better experience please rescale your image so that it is roughly half the size of your monitor screen.
You can change the background picture using File Open background image so that the picture displayed in Background Picture Display Mode can be replaced.
3D Modeling
Please refer to the picture below for the 3-Sweep modeling process
Selecting and Transforming
You can perform basic translating, scaling and rotating operations in Manipulating Mode. Basic mouse operations include:
- Left Click / Drag: Selection or box selection.
- Middle Click and Drag: Translating the mesh.
- Scrolling up and down: Scaling the mesh.
- Right Click and Drag: Rotating the mesh.
Altclick on an existing mesh to set up constraint on the rotating axis. A mesh can rotate around its own main axis by firstAltclick on it and then right click + drag.
Selection is enabled in Modeling Mode, Manipulating Mode and Viewing Mode. However we can not do box selection in Modeling Mode.
Copying, Pasting, Re-snapping and Deleting
When single or multiple meshes are selected, you can go to Edit Copy/Paste or simply pressing Ctrl+C and Ctrl+V to duplicate selected models.
The duplicated model, when translating to a new location, will not automatically re-snap to image boundary. Instead, you should invoke re-snapping by clicking  button or pressing
 R. Note this action will restore current camera location.
Delete a model by first select the model and then hit the Delete key.
Viewing from Different Angles
You can control your camera in Viewing Mode. Basic mouse operations include:
- Left Click / Drag: Selection or box selection.
- Middle Click and Drag: Camera Panning.
- Scrolling up and down: Camera Zooming.
- Right Click and Drag: Camera Orbiting.
Assigning Texture
Textures can be applied to selected meshes by pressing button or pressing T.
If you select Yes for Patch Match, the foreground in the original picture will be removed and you are brought to Background Picture Display Mode automatically.
Taking Snapshots
You can take snapshots of the current scene by pressing  button. This will prompts you a dialog allowing you to choose the saving directory of your snapshot.
Exporting Meshes
If you want to export the meshes for further manipulation in professional software like blender or 3D Max, first select the models and then go to file Export selected meshes to save obj file.
Material mtl file and corresponding texture images will be saved within the same folder.
Advanced Operations
Adding Constraints
There are 6 types of geometric constraints provided by this software:
 Parallelism: The main axes are parallel to each other.
 Orthogonality: The main axes are orthogonal to each other.
 Colinear Axis Endpoints: The connection of nearest endpoints and one of the axes are colinear.
 Overlapping Axis Endpoints: The nearest endpoints in image space overlap.
 Coplanar Axis Endpoints: the endpoints of axes are coplanar and the plane is orthogonal to both axes.
 Coplanar Axes: Two axes are coplanar. Note this is the only constraint that will take effects on bended meshes.
You can open the constraint window by clicking to view all the constraints currently added. To add a new constraint, simply select the meshes and clicking on the corresponding button in constraint window. When you want to delete a constraint, simply select that constraint item and hit Delete.
When doing optimization, you may want to play with the sliding bar below controlling the balance between changing endpoints positions and changing z coordinates. See our accompanying video for demonstrations of the effects of this parameter.
Press to perform final optimization. Only relevant meshes will be transformed. If the model is assigned a texture before, the texture will be recomputed.
Edit Detected Edges
Border Edit Mode allows you to edit current detected edge. When you import an image, a dialog will automatically prompts up asking you what method should be used to extract the edge of image. The quality of edge map will largely influence the modeling performance so please take care of this step.
We provide two basic tools for edge extraction and one extra tool utilizing COB (Convolutional Oriented Boundaries. K.K. Maninis, J. Pont-Tuset, P. Arbeláez, and L. Van Gool. ECCV 2016) edge extraction method:
- Canny: the edge is detected using Canny method controlled by a single parameter;
- Grabcut: the edge is detected by interactively selecting the foreground the background zone of a picture. When you press
configurebutton in the GUI, an Grabcut interactive session starts. PressHduring the session for detailed introduction. - COB: Convolutional Oriented Boundary is a ECCV 2016 paper trying to apply deep learning algorithms to edge detection and achieve State-of-the-Art edge extraction performance. A COB server is needed to do a COB forward pass and you will have to acquire the correct server IP Address and License from an administrator. We will provide a demonstration server soon.
After importing, you can revoke the edge detection by clicking  on the toolbar of Border Edit Mode.
Snapping Pen Tool  can be used to draw edge map. Left click to add line segment, right click to end line segment. When right-clicked directly, the pen acts like a 'snapping pen': it will choose the nearest detected boundary from current position of the cursor. Eraser Tool
  can be used to erase edges; please use
 [ and ] to control the size of the eraser.
If you want to save the border file for future demonstration, go to File Save border file. A .tsborder file will be automatically generated by our program.
Other Preferences
Go to File Settings for advanced preferences. The settings file will be stored within the same folder as the main executable file. 3-Sweep will not check the validation of the defined parameters while loading the settings file so please do not edit it directly.
The meaning of the values in settings are as follows:
- Modeling.InnerRange: Low bound percentage of search beam when finding the radius of next level based on the previous level of our generalized cylinder.
- Modeling.OuterRangeBase: Up bound percentage of search beam.
- Modeling.SampleFrequency: Sampling frequency in image space when determining the radius of mesh.
- Modeling.BendingMesh.MaxBendAngle: Maximum bending angle when drawing the bending part of a mesh. This regularizes users' drawing.
- Texture.TextureExtrapolation: If enabled, the texture on the boundary of your mesh will be automatically synthesized and extrapolated. (Otherwise part of the background maybe visible on the mesh)
- Texture.ExtrapolationLength: The length of extrapolation.
- EdgeDetection.SnappingPenTool.Threshold: Canny threshold when using snapping pen tool.
- EdgeDetection.SnappingPenTool.AutomaticConfirmBorder: Controls whether the border is automatically saved when exiting border edit mode. Otherwise you will have to click on
 every time you make changes to the detected edge image.
 - EdgeDetection.COBUpdateServer:
COBdetection method requires an external configured server for complicated computation. In order to correctly upload your picture, you need theIP AddressandLicenseprovided by an administrator. We will soon release the public address and license for demonstration.
FAQ
- Q: Why are the demos a little bit different from paper video?
- A: Three main reasons: (1) There are too many parameters (e.g. Modeling Options, Optimization Constraints...) to play with in the algorithm and we cannot guarantee that these numbers exactly match the paper; (2) The trajectories of mouse are much more casual in the demo. (3) The edge extraction method is different and the implementation is modified for more general use cases (e.g. we will not add constraints automatically). It should be noted that better results can be achieved with precise drawing and more dedicated parameter tuning process; we hope you can explore these things yourself!
- Q: Will the code be released in the future?
- A: Sadly but no. We can help port the application to Mac/Linux if possible.
- Q: I cannot draw anything on the canvas. When I load in a picture the canvas is still black.
- A: You can create a file named
gl.txtin the same folder with the program to specify the rendering technique you would like to use. If you are using outdated hardware which does not support OpenGL or are experiencing compatibility issues, please entersoftwareingl.txtto use Mesa as your software-based OpenGL simulator. Otherwise the program will automatically detect suitable hardware as the rendering backend. If you have dual graphics card, please consult your admin on how to switch to the hardware you want. - Q: I can draw objects normally but I cannot select objects nor take snapshots - what's wrong?
- A: Anti-aliasing mode is currently experimental and some graphics card may have weird behaviors. Simply disable anti-aliasing mode by
ViewUncheckCanvas Antialiasing. - Others: To be added...
Contact
If you find any problems (bug report, feature requirements, doc requirement, etc.) which is not mentioned above, please send an email to ts@heiwang.site. We will get back to you as soon as possible.